Sunday, August 31, 2014

My first rocket stove

Finally got the time to play with fire, so I built a variation of the 4-block rocket stove I saw on youtube.

Mine uses standard 16 inch concrete blocks, so I didn't have to go find a special stretcher block like the guy in the video used; on the other hand, mine did require some modification of one block.

So, here's how it went:

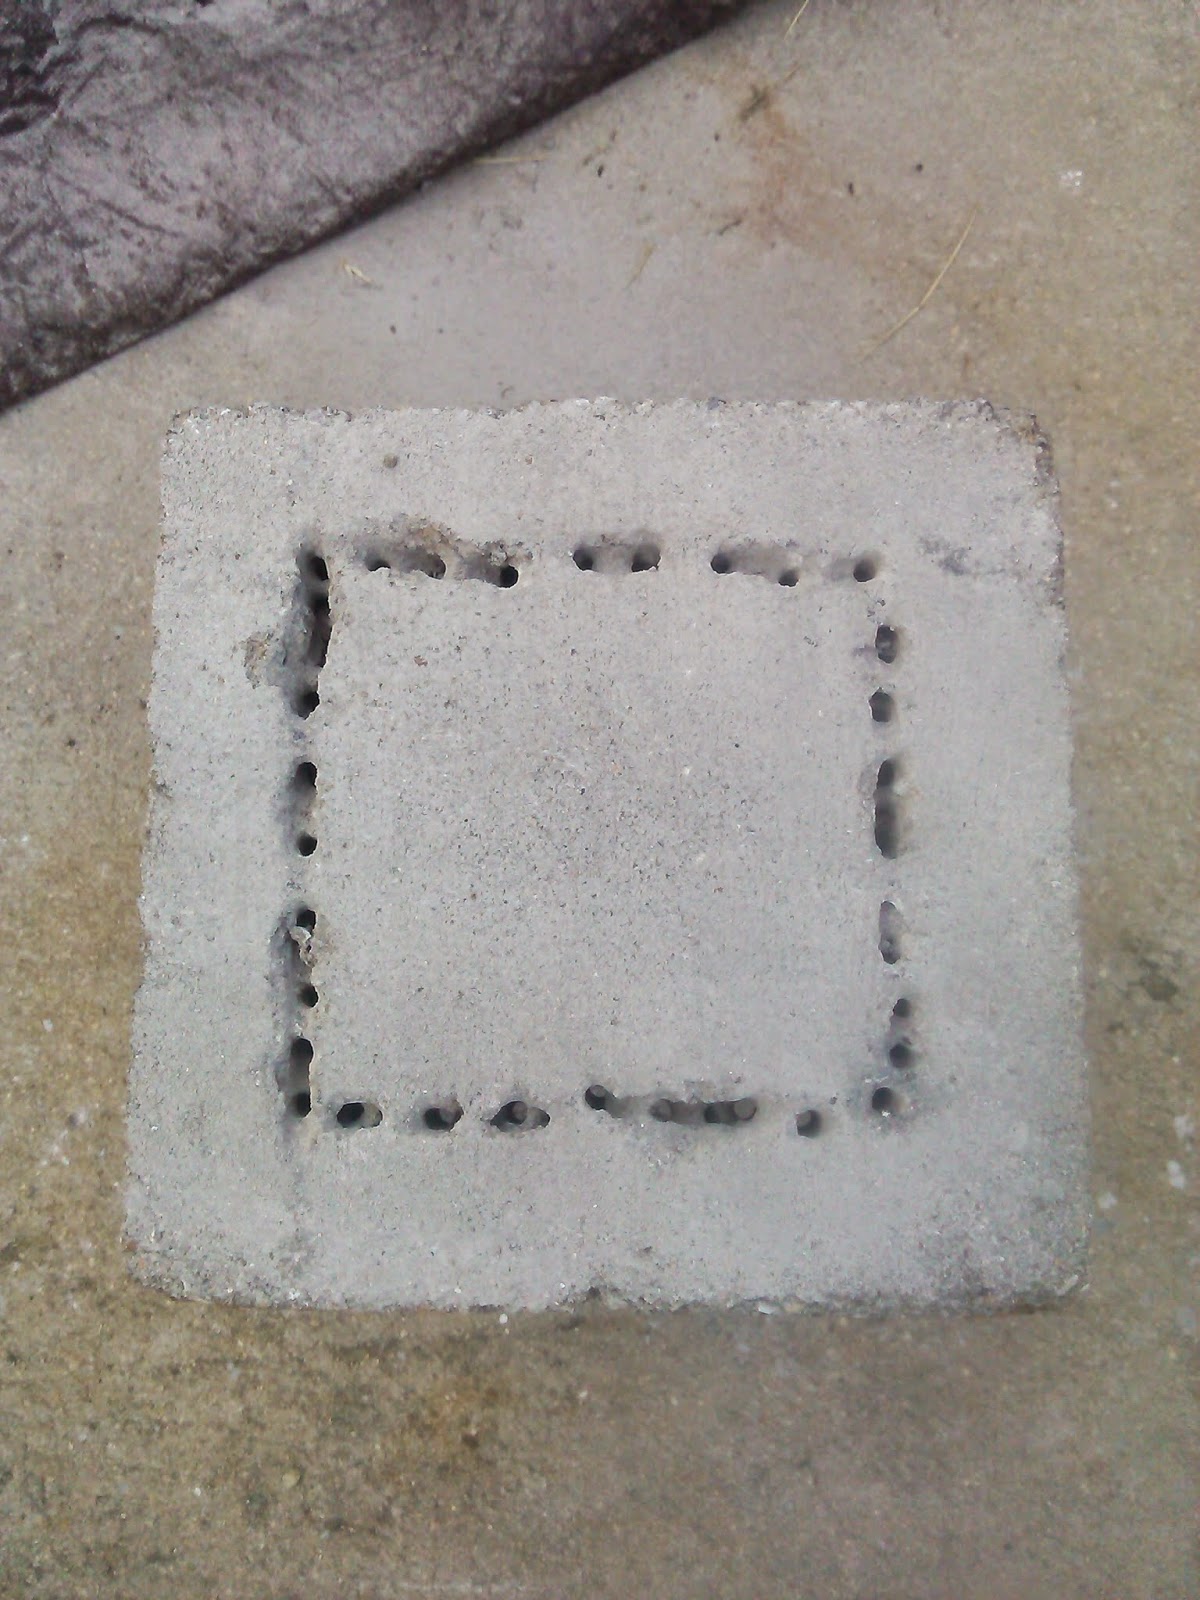
First, I modified one block so it can mate up with the feed tube:


I had a small mortar bit handy, so I perforated the block on the guidelines with the intention of chipping it out with the hammer. As it turned out, I just kept drilling in between existing holes until the piece in the middle dropped out, no hammer necessary.


Next, I set this 'transition' piece in place and leveled it, more or less. I have a gravel bed out back in an old swimming pool hole, so that made this part easy.


Then came the chimney, 2 of the remaining pieces:


One more block for a feed tube (the bottom leg of the L in an L-type rocket stove):


The fact that this picture above looks like an L is coincidental, just an artifact of the materials I used. The 'L' referred to when someone mentions an 'L-tube' rocket stove is the shape of the internal burn chamber and exhaust path.

Anyway, time to start some fire. First I preheated the chimney with some paper (and used too much, had to wait forever for it to get done but I didn't document all that).


This is looking in through the feed tube while the preheat fuel (scrap paper) burns in the chimney base (that modifed block I showed at the top of this page).


Then some long cardboard strips (the only larger fuel I actually had available at the time):


And hot-diggity, I got a working rocket stove, rocketing away:


I discovered, while using paper and cardboard scraps to feed this thing, that it does not actually make a great incinerator, because it's TOO efficient. When you're burning scraps, you often want them to go ahead and burn up so you can get on about your other business, but this thing makes the stuff last and last, which means you would be out here a long while if you had a lot of stuff you wanted to burn.

On the other hand, it shore does burn purty on just a little fuel; this thing would be great for emergency cooking.

Later in the evening, I added some more blocks to make a taller chimney. Even with the inefficiencies introduced by the cracks (where you can see the flame peeking through), it still creates a strong draw on the fire.


I had a lot of fun with this; it was mesmerizing to look inside the feed tube and see how the flames were being pulled through the chimney. The draw on this thing is really strong. I didn't get any good pictures of that; I was using my wife's phone for the pic-taking, and was afraid I would get it too close and melt it.

Looking forward to working with rocket stoves a lot more; I bought THE rocket mass heater book and also the videos featuring Ernie and Erica Wisner. Good stuff, I would highly recommend them. They also have a video covering a specific RMH build in detail, along with general construction info.

A decent representative taste of the good info available can be found on youtube.


Sunday, February 23, 2014

Using Linux to fix flash drive problems

I frequently have to deal with borked usb drives, where the drive is presenting itself as having some capacity below the real capacity, usually as a result of applying ISO images. This is fixable in Linux at the command line, but I can never remember all the steps, so below is the result of me finally getting my notes together in one place.

Steps below are based on the information at a digital forensics site, augmented by further research I had to do to handle problems that came up.


1) find the device (/dev/sdc, /dev/sde, etc) you want to work with
 
    sudo fdisk -l
    or
    sudo blkid
 
    are both good ways to see lists you can pick that information out of.
 
    blkid will require you to understand that you must drop the last digit, as it will list partitions like /dev/sdc1, /dev/sdc2, etc. "fdisk -l" will list both the partitions and the base device.

2) overwrite the device with with all zeros

    sudo dd if=/dev/zero of=/dev/sde bs=4M

    The block size can affect speed by quite a lot, but you have to have already performed trials on the device to really know *which* bs=xx numbers to use. When in doubt, just chunk in 4M and accept the wait.

    See this page for discussion of why /dev/zero is generally acceptable even in secure situations.
    See comments under the digital forensics article  for discussion of theoretical reasons some might still prefer to use 'shred' or 'random' overwriting methods.

3) create a new partition table of msdos type

    (You may have to eject/unmount first to prevent 'in use' parted errors)

    sudo parted /dev/sde mklabel msdos

    NOTE that parted calls tables by the name 'label', thus 'mklabel' instead of 'mkparttable' or some such. Dunno why, presumably some historical thing I'm too apathetic to look up.

4) create a new primary partition intended for fat32 filesystem, starting on the 8th sector after the partition table and ending at the end of available space:

    sudo parted /dev/sde mkpart primary fat32 8s 100%

    Starting sector alignment can affect performance a lot. Parted will complain if you specify a starting sector that is not optimal; you can tell it to ignore the problem and push on, but the device will very likely not perform at its best it you do that. Here's how to gather the info needed to tell parted the right starting point for best performance for a particular device:

get topology info from the system:
    cat /sys/block/sde/queue/optimal_io_size
    cat /sys/block/sde/queue/minimum_io_size
    cat /sys/block/sde/alignment_offset
    cat /sys/block/sde/queue/physical_block_size

Each of those commands will print something to the screen.

If optimal_io_size is not zero, then calculate the starting sector like this:

    start_sector = (optimal_io_size + alignment_offset)/physical_block_size

Assume the formula gave a start_sector value of 2048. Then your parted command would be:

    sudo parted /dev/sde mkpart primary fat32 2048s 100%

If optimal_io_size is zero, then if alignment_ offset is also zero and minimum_io_size is a power of 2, then use a start_sector of 1M:

    sudo parted /dev/sde mkpart primary fat32 1M 100%


If the above conditions are not met, use the reported minimum_io_size. Assuming minimum_io_size = 512:

   sudo parted /dev/sde mkpart primary fat32 512B 100%

      NOTE the 'B', specifying start point in bytes, not sectors.


If even minimum_io_size is not defined, use the physical_block_size. Assuming physical_block_size was reported as 512, the command would look the same as above. If yours is different, just replace the 512B with (physical_block_size)B, without the parenthesis.

I got straightened out on clearing that annoying parted alignment error by reading these pages:
     http://rainbow.chard.org/2013/01/30/how-to-align-partitions-for-best-performance-using-parted/
     http://h10025.www1.hp.com/ewfrf/wc/document?cc=uk&lc=en&dlc=en&docname=c03479326


5) format the partion as fat32 (note the '1' appended to the device path, for 1st partition)

    sudo mkfs -t vfat -F 32 /dev/sde1

6) view what you've got so far:

    sudo parted /dev/sde print

7) give the device a volume label:

    mlabel -i /dev/sde1 ::mydiskname

    Here again, specified sde1 rather than sde. The volume label part is 'mydiskname'. That is what will show up next to the drive letter in Windows Explorer, or as the path to the device in the media folder in linux ( /media/mydiskname in Crunchbang distribution, it varies a little in others).

    NOTE that mlabel is msdos-specific. If you formatted the drive as ext2,  you would do it differently (e2label, I think).

    ALSO NOTE:

  • you need the mtools package to get mlabel.
  • The mlabel syntax above is undocumented, at least in my system's man pages. I got the info from here.
  • you may need to add  'mtools_skip_check=1' line to your ~/.mtoolsrc file (create file if isn't there) to prevent errors related to drive sizes not being what mlabel expects.


Friday, August 9, 2013

Webcomics I want to remember

Need a  launch point for checking on the webcomics I like; the list is getting long enough that I forget a few some days.

I don't like any of the web sites I've found so far that claim to help with scheduling this kind of stuff, so a simple list here will have to do for now. Not sure how I'm going to handle the ones that I'm not up to date on (i.e. still working back through the archives, so just the current-comic address won't work).

Open Most (i.e. currently updated and moderately safe for work)

Friday, July 19, 2013


Revisiting a link I saved a while back, about dealing with lots of  information (reading for understanding, but also reading a lot), on Matthew Cornell's 'the experiment driven life' blog.

I'm still thinking on it, but so far I like the first, simplest method he references at the start of the article, paraphrased my way here:

Quick Reading For Understanding
read table of contents, possibly index (if simple/short index)
then start over and read
     section, chapter titles, subtitles, bold headings
then start over and read
     first line of every paragraph
then start over and read
     entire book


Aside from the deeper understanding and memory retention all the above supposedly promotes, seems to me you might also get the benefit of a higher confidence in a decision to deep-six a book before the final 'proper' reading. I mean, once you get finished reading the first line of every paragraph, you can have a fair amount of confidence in your judgement of whether the book is worth pursuing.


I wonder if there exist reading scripts that help with this for e-books (like folding editors); set the current reading level and just read, with the deeper level stuff hidden until needed.

Vim/emacs could handle it  I'm sure; I wouldn't be surprised if one or both didn't already have a mode or script for it.

From the other end of the stick, what about writing with this sort of reading in mind?
for print:
literally print the toc,
then just a listing of chapter and section titles and subtitles
then just the first line of every paragraph
then the full text

for web/pdf/anything that supports scripting:
write within a folding structure so that deeper levels are
hidden until desired/needed.

The for-print version would probably not fly very well; too much extra printing. Still, an author could assist in the process by at least using a different font or bold-face or underline the first line of each paragraph. That would make it easier for the eye to jump from one to the next.

Saturday, July 13, 2013

Conic Shelters

I came across Chuck Henderson's Conic Shelters information a couple of years ago (maybe three? time is slipping on me...) and got quite excited about it. Subsequent life events have interfered with getting anything built yet, but this is one that is definitely On My List. Here's a little information on them:

Conic shelters/structures are what they sound like: shelters that have a conical shape. Score one for Captain Obvious, right?

What is less obvious is that conics have some properties that offer the possibility of building decent living spaces both cheaper and more durably.  For instance, the conic can serve as both roof and walls, to a large extent. The curvature gives it a lot of strength. That same curvature reduces the need for strength, since wind can flow around it easier; possibly good news for tornado prone areas (like mine...).

One property unique to conics (as opposed to hypars, domes, and other thin-shell shelter types) is that the conic shelter really is a flat plane wrapped around to make the curves. You can see that for yourself with a piece of paper; when you twist it around into a cone shape, you don't have to actually stretch or rip anything; the plane curves into that shape quite handily.

Now image using many plywood sheets bolted together to make a quite large sheet of plywood instead of paper, and you have a pretty good idea of how some of Chuck Henderson's early Conic Shelters were actually built. He recommends a different order of operations today, but there were some  in the past that were actually built by just bolting together a large plywood sheet with appropriate bits left out (to facilitate mating without unnecessary overlap), then winching it up and around into itself with a gin pole and come-a-longs.

He has come up with multiple designs, including 'multi-conics' which intermingle different conic sections to form larger shelters, but the Umbra Cone (simple conic), in particular, strikes me as the most  elegantly simple solution to basic shelter durability out of all the conic designs.

He has also been experimenting with smaller shelters that turn the cones over onto their sides and mate them together like a clamshell standing upright, sort of. Interesting look, and he shows how easily they can be assembled (after the two halves have been pre-built as flat pieces) here:

Now for a few cons:
The multi-conics are interesting, and pretty, but I'm not convinced they would necessarily show the same resistance to high winds that a simple cone would. If I build anything, it's probably going to be a plain Umbra Cone, or some slight variation thereof, but still a plain cone; no inter-mingled partials.

The smaller refuge patterns share a similiar con; they look interesting, but I would not consider them to be as strongly proven as a durable shelter as the plain conic.

The little refuge patterns also have a moderately greater complexity in their cut patterns. The big conics use almost entirely one size plywood square; the little ones have nearly every piece cut differently. Granted, he may have changed that by now; it has been a while since I looked at the preliminary plans, which Chuck was kind enough to send me for preview way back when I ordered the plans for the conics and multi-conics.

That leads me right back out of the cons into a pro: Chuck is very helpful, very willing to talk to you and get feedback on how to make the design instructions clearer. He is also clearly continuing to experiment and work on improving these ideas. I was quite pleased to be able to actually get the originator of a nifty idea on the telephone and ask him questions directly.

Chuck's site appears to have multiple copies and/or entry points; here are a few:
http://conicshelter.com/
http://www.fishrock.com/conics/default.html

refuge assembly
multi-conic flexibility demo


Avi Rotem's take on conics is described on this page, after the overview of Chuck's Conic Shelters:
http://www.greenhomebuilding.com/conics.htm


Friday, April 27, 2012

This Popular Science quickie is actually a home made forge idea, but it strikes me that it would make a great stump burner.


Just drill in at an angle, insert metal pipe, turn on blower and burn the stump at high speed...

Sunday, April 8, 2012

Solid Lumber Construction

I've been considering the notion of solid lumber construction for a little while now. Note, that's solid LUMBER, not solid TIMBER; we're not talking about log homes here, although the construction methods would certainly share some characteristics (thermal mass, good solid feel to everything, local sourcing not only possible but fairly simple, etc).

I first got the idea from an artsy piece my wife showed me, a smoking shelter design from schindler-salmeron. It's really nice looking, but the thing that caught my attention was the simplicity of construction. Everything is essentially a box-joint with giant fingers.

So...I did some rough calculations, and I realized that this would actually be a fairly economical way of building structures. Not the cheapest, but cheaper than conventional, and helluva lot simpler in some ways.

A little more looking around showed that someone else has thought along these lines. There's no indication they followed through, but they seem to have come to the same general conclusions as I did, that this would be an affordable, durable, and sturdy-as-all-get-out building method.

Then, while pursuing my look-at-old-stuff-on-google-books addiction, I came across a 1954 Pop Sci 2-pager on 'solid wood houses' showing that, yet again, I'm years behind the times on ideas. They show a couple of different ways to use solid lumber, so some more good food for thought there.

Here's one pic from the article, showing how one guy used random lengths of lumber as 'bricks' during construction:


And, finally, I remembered I had seen furniture constructed this way, and had even bookmarked one example and forgotten about it until reminded by all of the above. There was apparently a fair amount of interest in the 1970's and 80's in butcher block-ish furniture, and at least one guy showed how to make decent looking furniture from construction-grade furniture.

That's all for this weekend...

UPDATE: the www.schindlersalmeron.com site has apparently ditched their smoking shelter design, or at least hidden the thing where I can't find it, so I changed the link to point to some other guy who, thankfully, had archived the images instead of just linking to them.

Saturday, March 17, 2012

Project-less Posting


No project post this weekend, or at least not right now. Too wiped out; my blood sugar cratered yesterday evening, the worst ever.

For those who have never experienced it: low blood sugar tendencies does not just mean you get 'a bit cranky if you go too long without a sandwich'. If you're watchful enough not to let it get too far, that may be all that happens, but if you do something incredibly stupid, like go all day without eating anything while remaining active, it can hit you like a ton of bricks.

Weakness, 'the shakes', and, in a severe case like yesterday, the discovery that you are very near to passing out. Not fun. If you push it far enough, you can pass out.

But wait! The next part is even more fun!

See, when my blood sugar gets just a little low, I can fix everything up with a quick snack, a glucose tablet if I have them handy (not often), a soda, whatever. But when I screw up and let it get the point of shaking, then I have to deal with the backlash effect.

The backlash comes after I eat something, at which point I feel even worse for a while. So then I'm stuck between Shittiest Option 1 (feel crappier and crappier until I pass out) and Still Really Shitty Option 2 (eat something, feel even worse temporarily). No others available.

So yesterday, when I realized how far it had gone, I grabbed some food from a drive-through, and discovered that letting the sugar low get the worst ever did indeed cause the backlash to be the worst ever.

Not to put too fine a point on it, I nearly puked. With every bite. But, I literally had to eat. I had already had to pull over and stop because I felt like I was too weak to control the steering wheel, there was no way I could afford to let my blood sugar drop any more.

So, bite, almost puke, chew, chew, swallow, almost puke, wait for the cold sweats to subside, then bite, almost puke, chew, chew, swallow, almost puke, wait for the etc. I made it about 3/4 of the way through the sandwich and half through the fries, I think. Then I had to just lie down on the seat and rest for a bit.

Two hours later I woke up from an uncomfortable doze and continued on down the road. Fun evening.

Saturday, March 10, 2012

The Woodworker's Slave...


...is a mighty provocative name for something that is really just a moderately nifty DIY work support, found in the 1940 January Popular Science (p189). Follow the link and scroll down a bit to see more details on how to make it. Here's a screen cap from that page:


It's a simple design, and I'm sure you've seen that kind of height adjustment before, as have I. Nothing major to comment on, I just haven't seen it on a work support before, so it caught my eye.

Plus there's the business of the name; not sure how that would go over today...

Sunday, March 4, 2012

Ken Isaacs

Ken Isaacs was a designer/architect who focussed a lot on the idea of creating multi-use items that didn't require massive woodworking or craftsman skills to modify, or even build in the first place. His Matrix building 'system' (long before the Movie, no relation in any way) survives today in the form of Grid Beam building.

Think 'wooden erector set'. Well, no need to just think it, you can look at it (bottom of linked page) because it actually existed in kiddie size, right around the time Ken Isaacs was developing his first ideas along those lines. Scale the stuff in that picture up a bit and you have almost exactly what he came up with. I have never seen any suggestion that there was any connection, it's just a neat coincidence as far as I know.

I obsessed over tracking down information on him for a while, especially on the building system that became Grid Beam. Been meaning to get it together in one place, or at least links to all the bits and pieces (besides the one pdf of  his Living Structures book that always turns up in searches).

And now I'm finally doing it.

Books
Culture Breakers, Alternatives & Other Numbers - (1970) the lesser known of his books, this one covers more of his experiments with less nuts & bolts construction detail. Also less hippity-doo-dah early 70s jargon than the other one. Excellent idea book.

How To Build Your Own Living Structures - (1974) the one most referenced of his two books. Doesn't quite cover as much of his full idea span, but goes into much greater detail on how to actually build the stuff.

Despite how the name sounds, he's not (just) talking about housing in this book, he covers many different 'structures for living', i.e. highly multi-purpose, flexible arrangement furniture. Great DIY book, all of the stuff combines simple DIY skills with high utility.

Lots and lots of  flower child talk, including some things I suspect he just made up on the spot because it sounded 'hippie'.

How To Build With Grid Beam - by some later advocates of his system. They tweaked it over the years to be still more flexible and ironed out a few wrinkles, then put their accumulated knowledge together into this book. I would say this is a required book if you really want to use this stuff instead of just read about the early phases of  Ken Isaac's work. They have a web site, but it seems to be stagnant. I have never succeeded in contacting any of them, by email or 'phone.


Articles

Home In A Cube - Life, 1954 Oct 11, p91
Matrix At Cranbrook - Industrial Design, 1958 Mar
The Knowledge Box - Life, 1962 Sep 14, p109
Isaacs was a PS Design Consultant until one of the PS editors supposedly accused him of not being able to design anything but cubes, or something like that (can't find the reference now...). Up until then, he made a fairly regular contribution to the magazine. Not all of the PS work is in his books.
How To Build The Superchair - Popular Science, 1968 Mar, p160 (the article is missing from the online archive, but it is reproduced in the Living Structures book)

A Roomful of 2x2s - Popular Science, 1968 Apr, p170

How To Build The Microdorm - Popular Science, 1969 Mar, p138
The Living Cube 4x4 - Popular Science, 1969 Mar, p216
Way-Out Fun House for Your Vacation Lot - Popular Science, 1969 July, p131
An I Table and a Set of Cube Chairs - Popular Science, 1969 Oct, p162
Build Yourself The Delta Desk - Popular Science, 1969 Nov, p160

A Security Shelter for Your Snowmobile - Popular Science, 1969 Dec, p148
Channel Modules (shelving) - Popular Science, 1970 Apr, p84

Building the channel modules - Popular Science, 1970 Apr, p94

Guest Room in a Ten-Inch Space - Popular Science, 1970 Sep, p86 
Building the Ten-Inch Guest Room - Popular Science, 1970 Sep, p104
Your Very Own Meditator - Popular Science, 1970 Nov, p92

The Table That Tops Off a Wall- Popular Science, 1971 Jun, p80
Jungle Cylinder for Backyard Fun - Popular Science, 1972 May, p158
Build a Vacation Cluster - Popular Science, 1972 Jul, p88


Ken Isaacs: Matrix Designer - The Politics of the Artificial, 2002 Mar 15, p60
Nice Quads - Dwell, 2007 May, p141